 DJV
DJV
DJV is an open source application for playback and review of image sequences. DJV can playback high resolution image sequences in real time, with audio, A/B comparison, and color management.
Features include:
- Support for high resolution and high bit depth images
- A/B comparison with wipe, overlay, and difference modes
- Timeline support with OpenTimelineIO
- Color management with OpenColorIO
- Multi-track audio with variable speed and reverse playback
- Experimental support for USD files
- Available for Linux, macOS, and Windows
Documentation
- Download and Install
- Main Window
- Viewport
- Working with Files
- Playback and Frame Control
- Timeline
- A/B Comparison
- Color
- Exporting Files
- Settings
- Keyboard Shortcuts
- Troubleshooting
- Building from Source
Download and Install
NOTE: Download packages only include a minimal set of video and audio codecs. To enable full support, either compile from source or replace the FFmpeg shared libraries.
Linux
Packages are distributed as tar archives. Uncompress the archive and move the DJV folder to a convenient location.
Windows
Packages are distributed as ZIP archives. Uncompress the archive and move the DJV folder to a convenient location.
macOS
Packages are distributed as macOS disk images. Open the disk image and copy DJV to the Applications folder.
The first time DJV is started there will be an error about security; to fix
this open the security settings and click the Open Anyway button:

Main Window
 Main window components:
- Menu Bar
- Tool Bars
- Tab Bar - Switch between currently opened files
- Viewport
- Timeline
- Bottom Tool Bar
- Tool Widget
- Status Bar - Errors and information about the current file
Components can be toggled on and off from the Window menu.
Splitters can be used to change the size of the components:

Note that the vertical splitter is only shown when the timeline is not minimized.
Full screen mode can be enabled from the Window menu.
A secondary window can be shown to mirror the viewport on a separate monitor. The secondary window can be shown from the Window menu.
Viewport
The viewport shows a view of the current file. The view can be panned, zoomed, or “framed” so the image fills the view.
Viewport controls:
- Pan - Ctrl + mouse click and drag
- Zoom - Mouse wheel or keyboard shortcuts - and =
- Frame view - Keyboard shortcut Backspace
- Wipe in compare mode - Alt + mouse click and drag
- Color picker - Mouse click
- Frame shuttle - Mouse click and drag
The viewport controls can be customized in the Settings tool.
The bit depth of the viewport can be set in the View tool with the buffer type option. The value RGBA_U8 will use an 8-bit buffer which is useful for lower end GPUs. The values RGBA_U16 and RGBA_F32 will use 16-bit and floating point buffers respectively.
The background color of the viewport can be set in the View tool. An outline can also be drawn around the image to disinguish it from the background, usefull for images with transparency.
Grid
A grid can be enabled from the View tool.
One example of using the grid is for examining individual pixels:
![]()
- Set Minify and Magnify to Nearest
- Enable the grid
- Set the grid size to one
HUD
Information can be overlaid on the viewport by enabling the HUD (heads up display). The HUD can be enabled from the View menu.
 HUD components:
- Current file name
- Current frame
- Playback speed
- Number of frames dropped during playback
- Color picker
- Video cache percentage
- Audio cache percentage
Working with Files
Supported file formats:
- Image sequences: Cineon, DPX, JPEG, OpenEXR, PNG, PPM, SGI, TGA, BMP, TIFF
- Movie codecs: MJPEG, MPEG-2
- Audio codecs: FLAC, MP3, WAV
- Timelines: OTIO, OTIOZ
- Experimental: USD
Files and folders can be opened from the File menu, by dragging and dropping onto the main window, or from the command line. Opening a folder will open all of the supported files in the folder (non-recursively).
The native file browser is enabled by default on Windows and macOS. The built-in file browser can be enabled in the Settings tool.
The current file can be changed from the File/Current menu, the Tab Bar, or the Files tool.
Memory Cache
The memory cache can be configured in the Settings tool. There are separate values for video, audio, and “read behind”. The “read behind” value is the number of seconds that are read before the current frame. This is useful to ensure frames are cached when scrubbing.
Only the current file is stored in the cache. When the current file is changed, it is unloaded from the cache and the new file is loaded.
Layers
For files that contain multiple layers (i.e., OpenEXR), the current layer can be changed from the File/Layers menu, or the Files tool.
Files Tool
The Files tool can be used to set the current file, the current layers, and compare options.
The Files tool can be shown from the Tools menu or the tool bar.
 Files tool components:
- The current, or A, file
- The B file(s)
- The current layer of the file
- Compare mode
- Compare time
- Compare options
Image Sequences and Audio
Audio can be added to image sequences either automatically or explicitly.
To automatically add audio to image sequences, open the Image Sequences section in the Settings Tool. Audio files can be found by either specifying the file extensions to search for (e.g., “.wav .mp3”), or providing a specific file name.
To explicitly add audio to an image sequence use the File/Open With Separate Audio menu.
USD
There is experimental support for USD files. The USD file is rendered to an image sequence with the Hydra renderer.
The camera used to render the scene, in order of priority:
- If the USD file is referenced from an OTIO file, the name of the clip
- The primary camera in the scene
- The first camera found in the scene
- A temporary camera is created that frames the scene
Playback and Frame Control
Playback and frame controls on the bottom tool bar:

- Playback controls
- Playback shuttle - Click and drag to change playback speed
- Frame controls
- Frame shuttle - Click and drag to change the current frame
- Current frame
- Duration
- Current speed
- Time units (frames, seconds, timecode)
In and out points can be set frome the Playback menu to limit playback to a section of the timeline.
The number of dropped frames during playback can be viewed in the HUD, which is available from the View menu.
Timeline
By default the timeline is minimized, showing only the first video and audio track. To see all of the tracks in the timeline, toggle the minimized state available from the Timeline menu.
 Timeline components:
- Current frame
- In/out range (blue)
- Video cache display (green)
- Audio cache display (purple)
- Video track
- Video clips
- Audio track
- Audio clips
Controls:
- Change the current frame - Mouse click and drag
- Zoom - Mouse wheel or keyboard shortcuts - and =
- Frame view - Keyboard shortcut Backspace
- Pan - Ctrl + mouse click and drag
The size of the timeline thumbnails can be set from the Timeline menu. Thumbnails can also be disabled to improve performance.
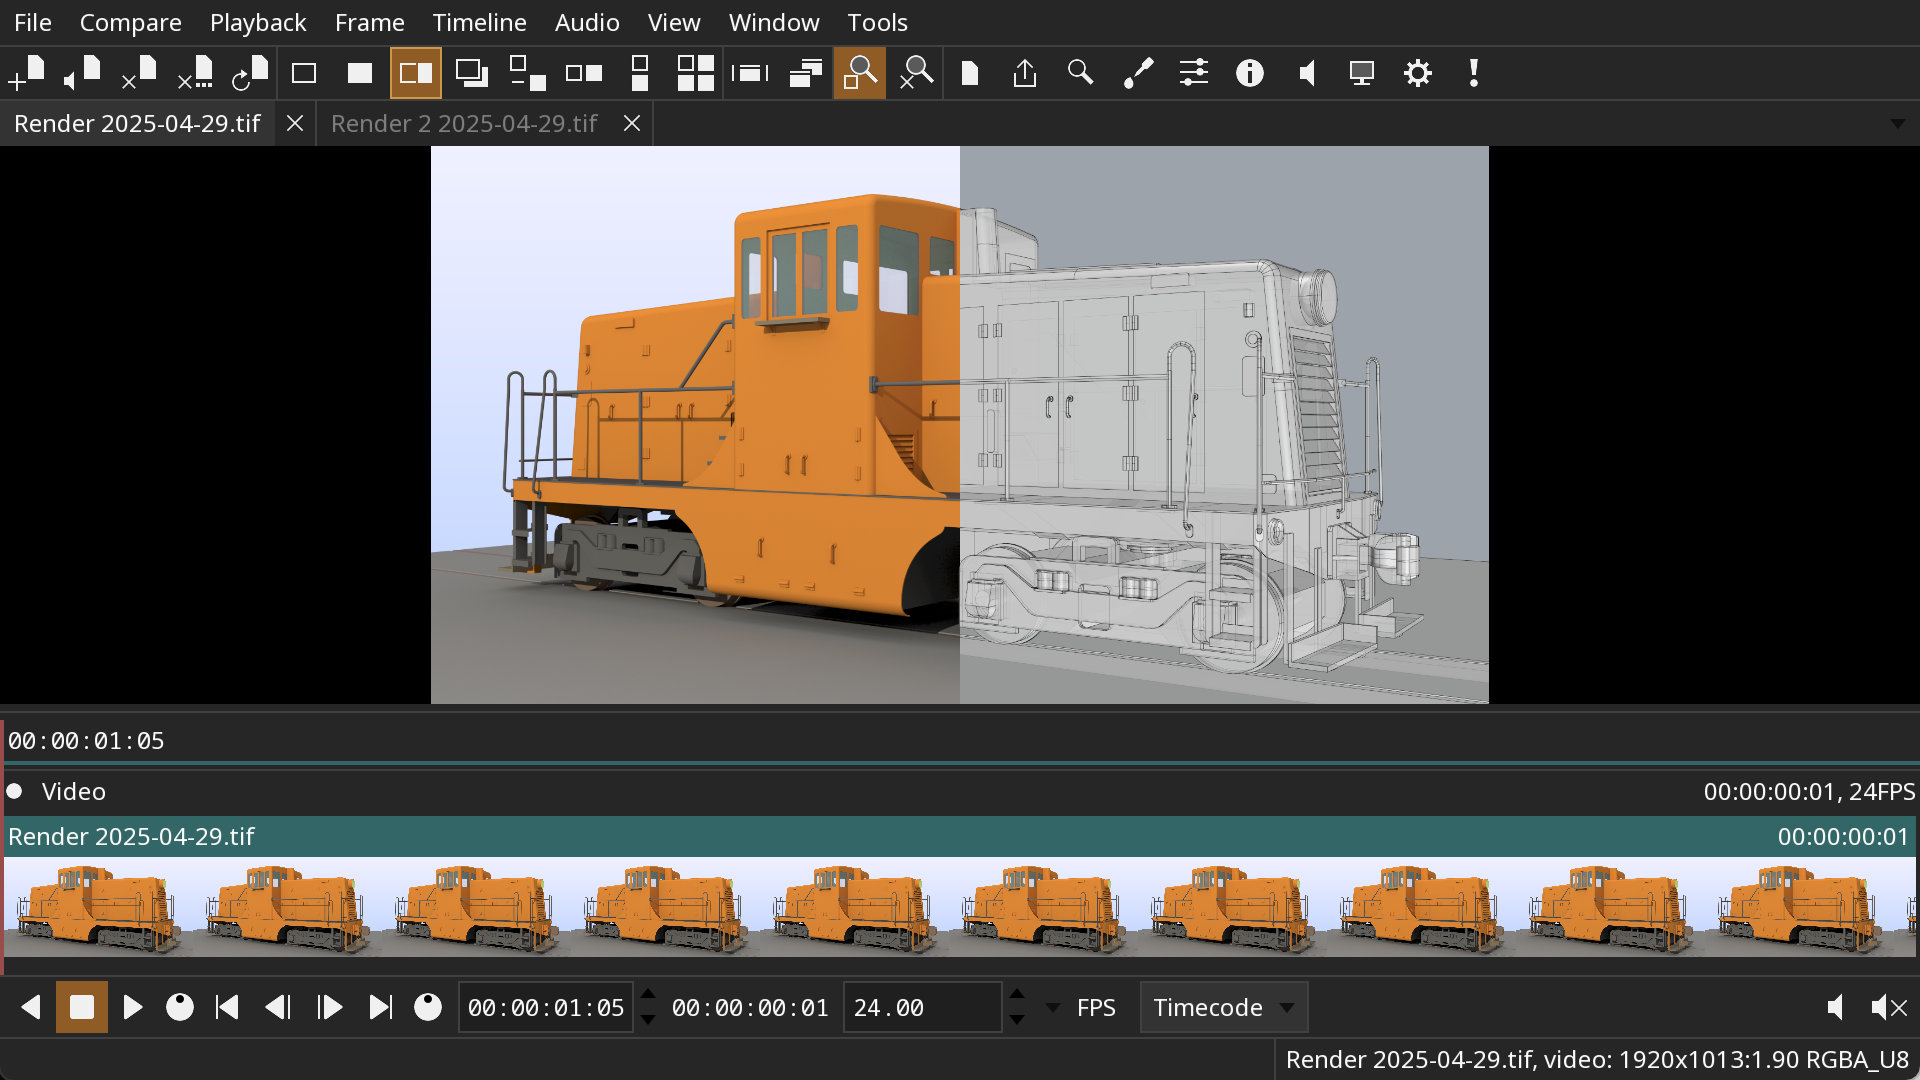
A/B Comparison
To compare files, open both files and set the B file from either the Compare/B menu or Files tool. The A file is the current file.
Compare modes:
- A - Show only the A file
- B - Show only the B file
- Wipe - Wipe between the A and B files
- Overlay - Show the B file over the A file
- Difference - Show the difference between the A and B files
- Horizontal - Show the A and B files side by side
- Vertical - Show the A and B files over and under
- Tile - Show the A and B files as tiles
Multiple B files can be viewed with Tile mode.
One example use for Tile mode is to simultaneously view multiple layers within a file. Open the file multiple times and set the current layer for each instance. Set one of the files as current, or the A file, and the rest as B files, and enable Tile compare mode.
 Compare multiple layers:
- Set the current, or A, file and layer
- Set multiple B files and their layers
- Set the compare mode to Tile
Files can be compared in relative or absolute time mode. In relative time mode the time of the B file will be offset to match the start of the A file. In absolute time mode the A and B times will be the same.
Color
The Color tool can be used to set OpenColorIO options, specify a LUT (Look-Up Table), or apply other controls like brightness, contrast, and levels.
The Color tool can be shown from the Tools menu or the tool bar.
 OpenColorIO options:
- Enable OpenColorIO
- OpenColorIO configuration
- Input color space
- Display color space
- View color space
- Look color space
The OpenColorIO configuration can be set to a built-in configuration, the OCIO environment variable, or a file name.
A LUT file can also be applied either before or after the OpenColorIO pass, by setting the LUT Order option to PreColorConfig or PostColorConfig.
Exporting Files
The Export tool can be used to export the current file as an image sequence, a movie, or the current frame as a still image.
The Export tool can be shown from the Tools menu or the tool bar.
 Export components:
- Output directory
- Render size
- File type
- Base file name
- File extension
- Movie codec
- Export button
To export an image sequence set the file type to Sequence. To export the current frame set the file type to Image.
The current layer, playback speed, in/out range, and color settings will be exported.
Note that audio export is not yet supported.
Settings
Settings are stored as a JSON file in the DJV folder in your Documents directory.
Keyboard Shortcuts
Keyboard shorcuts can be customized in the Settings tool.
The Settings tool can be shown from the Tools menu or the tool bar.
 Keyboard shortcuts components:
- Keyboard shortcuts settings
- Shortcut with keyboard focus
- Conflicting shortcuts
To set a shortcut, click the shortcut widget or use the tab key to give it keyboard focus, then type the new shortcut. The widget will turn red if the shortcut conflicts with another one.
Troubleshooting
Check the log file located in the DJV folder in your Documents directory.
If the application fails to start, try running from the command line to check for are any errors:
djv -log
Try resetting the settings:
- Delete the **DJV folder in your Documents directory
- Or pass the -resetSettings flag on the command line
Building from Source
A CMake “super build” script is provided to build DJV and all of the dependencies.
Building on Linux
Dependencies:
- CMake 3.31
Install system packages (Debian based systems):
sudo apt-get install xorg-dev libglu1-mesa-dev mesa-common-dev mesa-utils libasound2-dev libpulse-dev
Install system packages (Rocky 9):
sudo dnf install libX11-devel libXrandr-devel libXinerama-devel libXcursor-devel libXi-devel mesa-libGL-devel
Clone the repository:
git clone https://github.com/darbyjohnston/DJV.git
Run CMake with the super build script:
cmake -S DJV/etc/SuperBuild -B Release -DCMAKE_INSTALL_PREFIX=$PWD/Release/install -DCMAKE_PREFIX_PATH=$PWD/Release/install -DCMAKE_BUILD_TYPE=Release
Start the build:
cmake --build Release -j 4 --config Release
Run the application:
./Release/DJV/src/DJV-build/bin/djv/djv
Building on macOS
Dependencies:
- Xcode
- CMake 3.31
Clone the repository:
git clone https://github.com/darbyjohnston/DJV.git
Run CMake with the super build script:
cmake -S DJV/etc/SuperBuild -B Release -DCMAKE_INSTALL_PREFIX=$PWD/Release/install -DCMAKE_PREFIX_PATH=$PWD/Release/install -DCMAKE_BUILD_TYPE=Release
Start the build:
cmake --build Release -j 4 --config Release
Run the application:
./Release/DJV/src/DJV-build/bin/djv/djv
The CMake variable CMAKE_OSX_ARCHITECTURES can be used to specify the build
architecture:
-DCMAKE_OSX_ARCHITECTURES=x86_64
-DCMAKE_OSX_ARCHITECTURES=arm64
These aliases are convenient for switching between architectures:
alias arm="env /usr/bin/arch -arm64 /bin/zsh --login"
alias intel="env /usr/bin/arch -x86_64 /bin/zsh --login"
Building on Windows
Dependencies:
- Visual Studio 2022
- CMake 3.31
- MSYS2 (https://www.msys2.org) for compiling FFmpeg.
- Strawberry Perl (https://strawberryperl.com/) for compiling network support.
- Python 3.11 for compiling USD.
- NSIS (https://nsis.sourceforge.io/Main_Page) for packaging.
Open the Visual Studio command console “x64 Native Tools Command Prompt for VS 2022”. This can be found in the Start menu, in the “Visual Studio 2022” folder.
Clone the repository:
git clone https://github.com/darbyjohnston/DJV.git
Run CMake with the super build script:
cmake -S DJV\etc\SuperBuild -B Release -DCMAKE_INSTALL_PREFIX=%CD%\Release\install -DCMAKE_PREFIX_PATH=%CD%\Release\install -DCMAKE_BUILD_TYPE=Release
Start the build:
cmake --build Release -j 4 --config Release
Run the application:
set PATH=%CD%\Release\install\bin;%PATH%
.\Release\DJV\src\DJV-build\bin\djv\Release\djv